

In part one we covered
off why cream blush used to be cream crap and which brands have brought their
clever technology a-game to create new and delightful formulas that
caress rather than depress. Now on to how to apply that little container of
colour…
Making cream blush
look fresh and delightful is all down to two things, what goes on underneath
the product and the special art of how it goes from pan to cheek. My first
little crumpet of advice might sound controversial (in that you are always told
NOT to do this!) but it is well worth throwing that ever extolled piece of
cautionary advise to the winds and (only if you want of course) do what I
suggest because IT WORKS. Apply your cream blush AFTER your powder. I’ll
repeat: Apply your cream blush AFTER your powder. Why, why, why would you do
this when you are always told to match texture with texture? If you follow the
normal rule of applying cream blush straight after your liquid foundation, by
the time you come to powder and set (and if you don’t powder, ignore all of
this, set forth and apply directly!) your powder will cover it all up, give it
an unsightly greyish tinge as well as move your carefully applied cream colour
all over the place (it’s your brush twirling that does this). I guess by now
you are having horrifying visions of mushy pilling and balling all over your
cherubic cheeks because of such texture caution blowing but fear not! If you
really think about it, after you have applied your powder over your liquid
foundation your base has almost become a hybrid texture, due to your liquid
foundation actually slightly dampening your powder as you apply it. What this
means is that the texture of your cream blush is actually closer to the texture
on your skin than you think, and especially so if you are using one of the pots
of velvety gorgeousness I talked about in Part One. And even if you are a
liberal powder user and like a matte matte matte finish, my container to cheek
technique (coming right up!) means you will still avoid pilling and balling.
Now for my (highly prescriptive, sorry for the bossiness) preferred application technique. It’s all about how you scoop, what applicator you use, and how you pat. Start by scooping up your choice of cream out of the pan. I use the outer side of my finger nail or a cotton bud (if I am being unusually un-lazy), or if you are a brush addict (warning you won’t like what I have to say soon) you could use a fancy spatula type thing. Apply it to the back of your hand. Now using the TIP of your index and middle finger, smoosh that sludge around a bit so it breaks up and softens a bit. Pick up some colour with the middle part of your index and middle finger. SMILE – find those sweet apples! PAT (do not rub – pat up and down up and down please) lightly in the middle of those apples with the middle part of your fingers (the part with the colour on them). Keep patting (grabbing more colour if you need to) until you have the colour where you desire (move upwards and backwards and a little bit in towards your nose for a natural flush).
Now on to the whys.
WHY not use a brush, WHY the middle part of the fingers, WHY pat? Firstly, I
personally feel (and you may feel differently, and that is fine and fantastic)
that a brush causes you to use too much force, gives you less control and means
that you can’t blend it seamlessly. By using the middle part of your fingers
you are giving it a seamless look with no edges, very important if you want a
natural look. The natural warmth in your fingers will also help to meld it with
your skin. And it’s important to pat as this places this color where you want
it and lightly presses it together with the product you have underneath.
Rubbing just causes whatever you have on underneath to move about all over the
place and potentially pill.
From here you can just leave it for a fresh and radiant finish. In the vain of wanting my makeup to last as long as possible (i.e. if I am off to work) I am often tempted to apply a very light dusting (I do this wish a brush, just stippling it on very lightly and gently so as not to disturb my careful cream blush placement) of powder blush over the top. It makes it last longer and lends a brighter, fresher, creamier look overall.
So with that I leave you with my favorite little pearls for perfectly pretty cream blush. It all sounds very specific and bossy but do try it so you too can enjoy the immense loveliness of a creamy glowy gorgeous crème blushed cheek.
Do you have any favorite bits of cream blush advice? Care to share? Sharing’s caring!
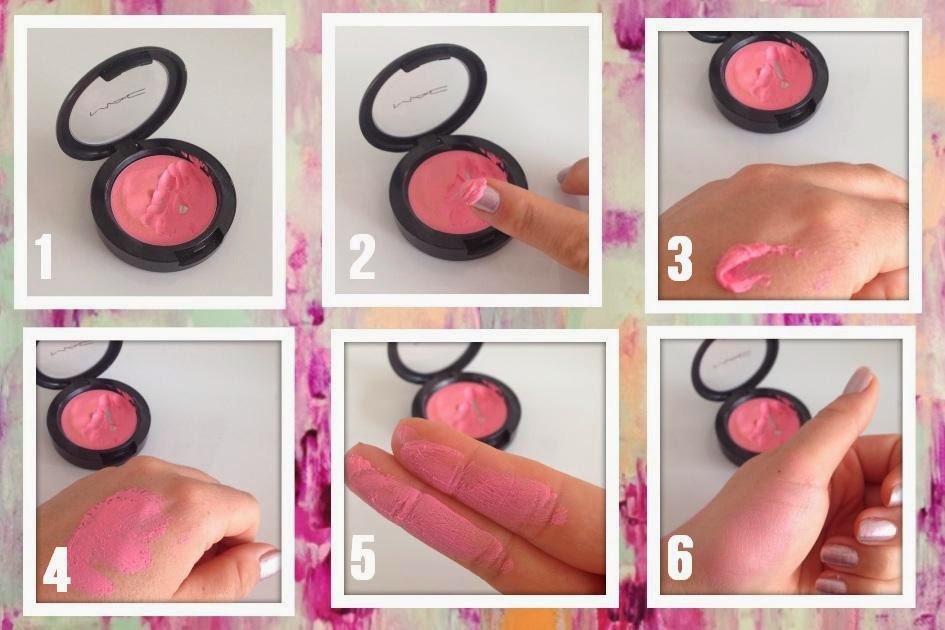
>1 - Select your product! (This is "So Sweet So Easy" Cremeblend Blush by MAC - a clean yellow based pink, great for brightening up your look) >2 - Scoop it up with something >3 - Place it on the back of your hand >4 - Smoosh it around a bit >5 - Pick up some colour with the center of your index and middle fingers >6 Pat!! Pat pat pat up and down until it is soft and blended. >7 (not pictured) - smile smugly because you have mastered it and look fabulous you gorgeous thing.
No comments:
Post a Comment